
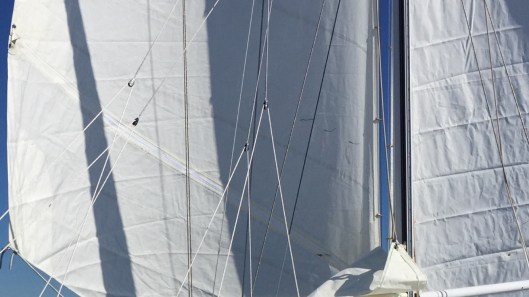
On the left is the genoa with the zippered bonnet. At the upper left of the photo you can see the working jib clew cringle and just below it the leather cover that protects the zipper. You can clearly see the zipper running diagonally down from left to right. You might also notice there’s is no cover for the majority of the zipper. It seems to handle the loads just fine.
I have been asked about our bonneted jib a number of times. I was asked about it again the other day on the Cape Dory forum. So, it seemed like a good time to provide more detail to those who might be interested.
I’m not an expert on bonnets. I can talk all day long about what we use on the FR. But, it’s my only experience with a zippered bonneted jib. I appreciate most people love their furler and would not want a hank-on sail. A hank-on jib, with or without reef points or a bonnet, will never be as convenient as a roller furling jib. So wanting, having, loving a furler is a non issue for me. I fully respect the decision to have what you like. I’m the oddball here. But, a zippered bonnet, or reef points, in a headsail, is a time-tested and seaman like solution for those that want an option to a furler.
A bonnet is essentially an additional section of smaller sail added to a larger sail to make it bigger still. I first saw them in pictures of gaffers and other traditional craft. Lots of times you will see them “laced” on to the foot of mainsails and jibs when the wind is light. I think square riggers used them along with stuns’ls to increase sail area too. I have of course read about the zippered bonnet the Pardey’s used on their 9 ton cutter Taleisin. They sang its praise having used it for tens of thousands of sea miles. So, I was familiar with the concept.
When it was time to purchase sails for the Far Reach I met with Mark Weinheimer, a local sailmaker that runs the Doyle loft in Oriental, NC. He has a lot of experience having worked as a sailmaker for most of his adult life. He was on the sail making crew for Dennis Conner and other 12 Meter teams in the 1980s. He also sailed his own engineless 34’ full-keel cutter so he is a bit of a kindred spirit in that way. When I first talked to him I explained that I did not want a roller reefing jib. I wanted a hank-on jib with a set of reef points. He thought about it and commented that with a sail that big there would be a lot of sail that had to be contained by the reefing ties. He thought it would trap water when sailing offshore and just be kind of difficult. He suggested a zippered bonnet. It did not take much to convince me and in fact I was surprised by his enthusiasm.
Mark designed the sail with the working jib clew at a height that maintained the same sheeting angle as the genoa, so with the bonnet on or off, the jib leads would stay in the same place.
The original version, made by the Newport RI loft, used a YKK zipper and a full length Velcro flap to cover the zipper on both sides of the sail. It was hell-bent-for-stout but was beastly to reef down. The Velcro was just too difficult to manage in that large amount. I took it back to Mark and for no charge he rebuilt it with a “proof-coil” zipper and only about two feet of Velcro flap on one side…near the leech and another smaller flap near the luff. It is as easy as can be to unzip the bonnet. There is a trick to starting it though as there is no box or starting pins. The two sides are lined up with corresponding marks and then the slider started. At first it’s a challenge and will elicit typical colorful sailor invectives but you quickly master it. You can’t do it in the dark without a headlamp. But, unzipping to reef is fast and intuitive. You do need a few minutes to zip it back up but you have time for it because the wind obviously is light enough to want to add sail area.
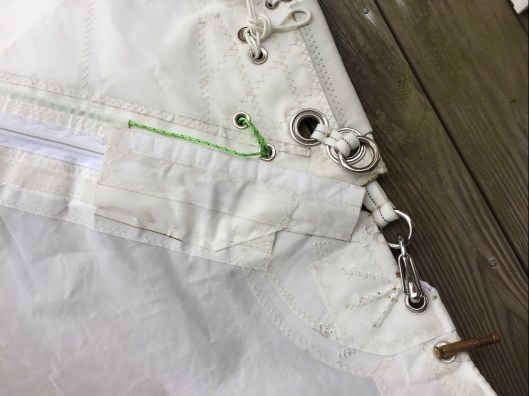
The leech is running vertically on the left. The toggle keeps the loads off the zipper. There is one on each end. Even if the zipper opens, the leech and luff remain connected to their respective parts. The black marks help me line up the two sides with the sliding car. The leather cover is snapped into place and prevents the toggle from getting caught on the forestay during a tack or gybe.
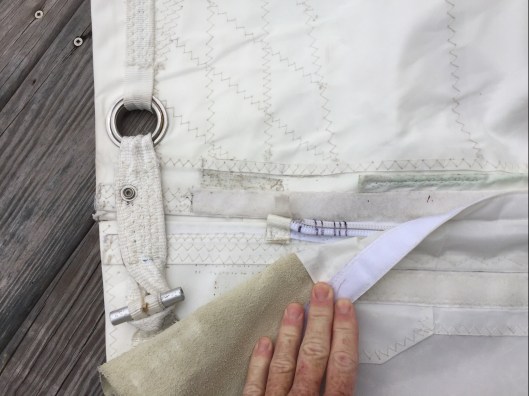
The luff is on the right and runs vertically. The working jib is on the top and the bonnet, which turns it into a genoa, is on the bottom. The zipper is under the short Velcro cover. The wichard hook snap replaces the toggle on the luff side. The green line is the leech line.
When short tacking we have had it come unzipped a couple times when the zipper end separated after hanging up in the forestay. We might add another short flap on the opposite side. The leather cover I asked Mark to add was a big help. The zipper has proven to be very strong. It has never come apart due to wind pressure. I have sailed with the genoa in winds up to 18-20 kts without issue before we unzipped the bonnet. Our jib is set up with the zipper starting at the luff. We have recently installed a easily removable dyneema forestay which makes short-tacking a non-event in the lightest wind so the zipper coming undone has solved itself.
So how is it to use? I like it … a lot. The sail shape, either as a genoa or working jib, is superb. When reefed (the bonnet is zipped off to covert the larger genoa to the smaller working jib) we keep the bonnet rolled up in a sailbag and stow it under the dinghy. We do drop the jib on deck to zip the bonnet on. I sit on the cabin top and line up the zipper teeth and get it started then just run it to the luff till it’s fully zipped. Nothing to it. It’s probably a 10-15 min evolution. Reefing down takes maybe 5 minutes. It takes some practice to figure out how to manage laying out the sail and so on and so forth. Time well spent sitting at the dock or on a mooring learning how. Yes, you have to go to the foredeck to handle the sail. Yes, you will have to get out from under the dodger to do it when it’s raining or at night or whenever Aeolus demands it.
The leech line runs from the clue of the working jib, up the leach to the head, down the luff and is adjusted at the tack. If adjusted at the clew I would not be able to reach it with the sail fully hoisted. There is a separate leech line in the bonnet. Has to be since they are in two parts.
I asked Mark about the life of the sail and he commented it would last longer than a roller reefing jib since there is no stress loading on the foot and leech when the sail is used in higher winds partially furled. We have a go-bag that we drop the sail into and keep it bagged on deck and ready to go. I would say we can get under way almost as fast as a boat with a furler. Unless of course we need to unzip the bonnet before we hoist due to high wind.

This is the go-bag. We drop the jib into the bag and zip it up. The front end of the bag, to the left, has snaps and secures around the headstay. The jib remains hanked-on and secured to the tack and the halyard remains attached to the head and secured in place by the downhaul. Our sailmaker sewed a full length mesh from a catamaran trampoline into the bottom to allow water to drain out and fresh air to enter.
Of course it is utterly reliable. It will never fail us. Even if the zipper blew out we would still have a very useful working jib. There is no cost to purchase or maintain a furler. You don’t need to hire a rigger to install it. You have complete access to your headstay and the turnbuckle. And when the wind is up offshore and you drop the jib and secure it to the deck sailing under the stays’l, there is less windage aloft without a furled jib. If you like hank-on headsails but don’t want to buy and store two headsails, a genoa and a working jib, you get two sails for nearly the price of one and only have to stow the small bonnet when sailing under the working jib. A genoa with reef points will do the same.
