
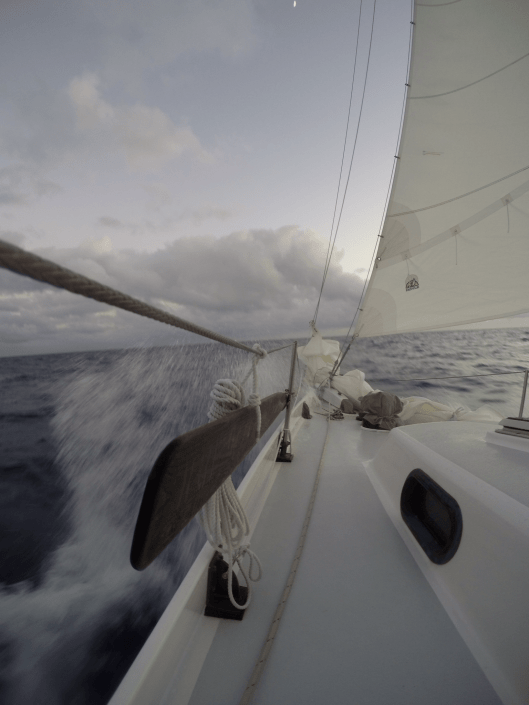
On passage, with a double reefed main and a stays’l. About 150 nm SSE of Bermuda enroute to the BVI, Dec 2015. The downhaul keeps the head of the sail secured to the deck yet the halyard remains connected to the jib and ready to be hoisted in an instant. The coiled downhaul is tied to the lifeline. Photo by Tricia Stone
I like sailing with a hank-on jib. A hank-on jib is more efficient and longer lived than a furling headsail. It is less expensive. There is less maintenance required and it is more reliable. But it is not as convienent as a furling jib…no doubt about it. While there are techniques for managing a hank on jib that are tried and proven, it does take skill, occasional acrobatics, and some planning to keep things under control. Our genoa is about 390 sqft. But, it has a bonnet that we can zip off that reduces it to a working jib size of about 280 sqft. But, the challenges are similar with either headsail.
We use a jib downhaul as part of our headsail handling system. A jib downhaul is a line (in our case 1/4” 3 strand dacron) that is attached to the jib halyard shackle and then shackled to the headstay. It remains connected to the halyard regardless if the jib is raised or lowered. The downhaul runs down through a low-friction ring seized to the jib tack fitting and then leads aft to the foredeck. When you let go the jib halyard and the sail drops you just pull on the downhaul ensuring the jib comes all the way to the deck and thus it can’t be partly blown back up the headstay. Unless you are into drama and high adventure, when you drop the headsail you have to know it will come all the way down and stay there. That’s what the jib downhaul is designed to do…help pull the jib down when the wind is up and then keep it down.
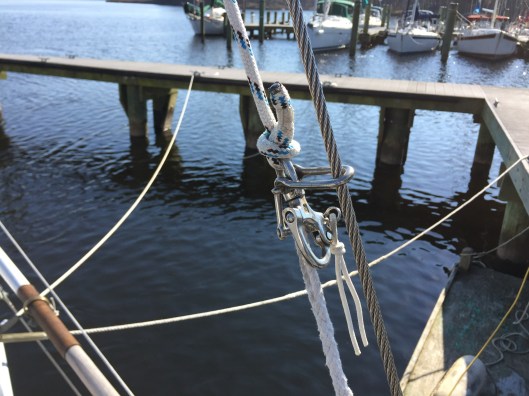
The downhaul is secured to the halyard shackle and both are shackled to the headstay.
The thing is, I had not figured out a good way to cleat off the end of the downhaul. For two years I simply tied it off to the forward port stanchion with a round turn and a couple half hitches. I hung the coiled downhaul on the sculling oar blade, stowed along the forward port bow (see the photo at the top of the article). It worked but it was not ideal. It took two hands. It could get hairy when the wind was up, off-shore or not, to get the jib down and secured. I thought about installing a cam cleat to quickly secure the downhaul. I did not want a Harken or Schaefer cleat for a location I knew would be bathed in saltwater. Also, it needed to have an integral fairlead to capture the line in place. And, aesthetically, a modern aluminum or SS cam cleat would clash with all the bronze deck hardware.
A couple years ago, I read a review in WoodenBoat magazine extolling the quality of bronze marine hardware hand made by JM Reineck and Son. I sent away for the catalog—only about 5 pages long. Jim Reineck did indeed make a bronze cam cleat with a double row of delrin ball-bearings and an integrated fair-lead. Looked perfect and I had seen one like it used for the same purpose on another boat I have long admired. But it was too expensive. I lusted for it for about a year. I kept looking at it in the catalog. I kept tying off the downhaul to the stanchion. Finally, I could resist the temptation no longer. I called Jim Reineck. He was very personable and answered all my questions. I gave in and ordered it. It arrived and it is in fact a gorgeous piece of hardware. But, it’s not bling. It’s well made, tough, has a practical purpose, and is designed for combat.
Because I occasionally remove the bowsprit from the boat I did not want to install the cam cleat with wood screws. Overtime, tightening and removing screws can wear down the threads the screw originally cut into the predrilled holes. After a few times the fasteners starts to have a weaker grip on the wood. Thus, I desired to install the cam cleat with machine screws. Here’s how I did it.
I used a fostner bit to counter sink (2) 1/2” diameter holes 1/2”deep in the bowsprit. Then I epoxied into each hole a G10 plug I previously cut from a sheet of G10 with a hole saw. As part of the installation, I faired over the inserts with thickened epoxy to ensure the surface of the sprit was perfectly flush. When cured, I tapped threads into the G10 plugs for 10-24 bronze machine screws that secure the cam-cleat to the bowsprit. The G10 plugs keep any water that gets into the threaded hole from making contact with the wood. Also, though the G10 is not as robust as threaded bronze, it should allow many removals of the fasteners without loss of strength. And, it’s a simple matter to replace the inserts if the need should ever arise.
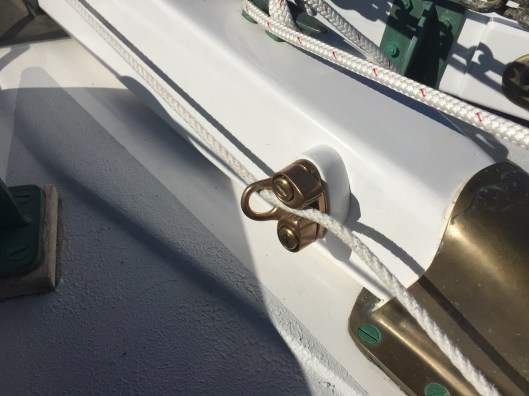
The bronze cam-cleat with integral fairlead was handmade by JM Reineck and Son. Though beautifully it’s made for combat.
In order to maintain a fair lead for the downhaul, I needed to install a teak riser pad under the cam-cleat so the removable forestay control line would not interfere with the downhaul when I was using it. I shaped and test fit a teak riser then applied four coats of white Interlux Brightside paint to match the paint on the bowsprit. I installed the cleat with Dolphinite pliable bedding compound to make it easier to remove in the future.
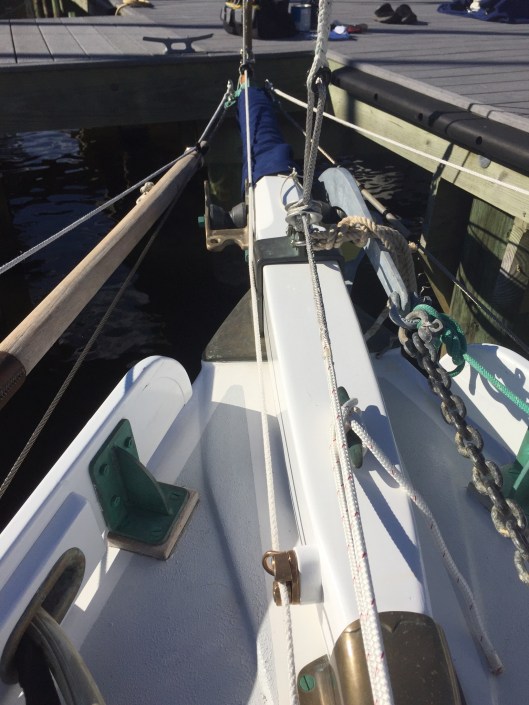
You can easily see the downhaul in this photo exiting the low-friction ring secured to the kranze iron and then running aft to the bronze cam-cleat on the aft end of the bowsprit.
I have not had a chance to use it under sail but I have practiced with it at the dock. I think it’s going to work out well. Still not as convenient as a furler. But, it’s a simple solution for simple system.

Goood reading this post
LikeLike
Glad you find the info useful.
LikeLike