

The removable dinghy step is about 24” long x 9” wide. The sub frame is iroko and the treads are teak.
We have found getting from the dinghy up to the Far Reach is not always so easy. It’s a little over 40” from the waterline to the top of the bulwarks. It’s not just us. I think many cruisers find climbing from the dinghy to the mothership a challenge, especially as we get older. And, the traditional stern on the Far Reach means the best way to embark or debark is along-side vice over the stern. Many modern sailboat designs include the now ubiquitous “sugar-scoop” transom, which greatly simplifies the task of getting from the dinghy to the sailboat. The disadvantage of a sugar-transom is that it makes the boat less secure. It’s easy for an unwanted visitor to get aboard the boat by clandestinely swimming up to the stern and crawling up and over the sugar-scoop. And sugar scoops, generally, detract from the aesthetics of the boat. But I digress.
We normally had no trouble boarding when we used the inflatable though it was dicey in an anchorage with a significant swell. We stood up on the inflated tube and though it was a big step to the deck it was doable. But, forget it in the Fatty Knees especially with a big swell or chop running because a hard dinghy requires you to exit from the center of the dinghy. You simply can’t make a step that big. We tried incorporating our swim ladder into the boarding process but it’s long length often resulted in the dinghy crashing into the ladder with the potential to mar the finish on the Far Reach and the dinghy. I don’t like a lot of excitement for something that should be as simple as climbing in and out of the dinghy. When you’re living on the hook the transfer between the mothership and dinghy is an everyday event. We depend on the Fatty Knees, so we needed to come up with a solid reliable solution.
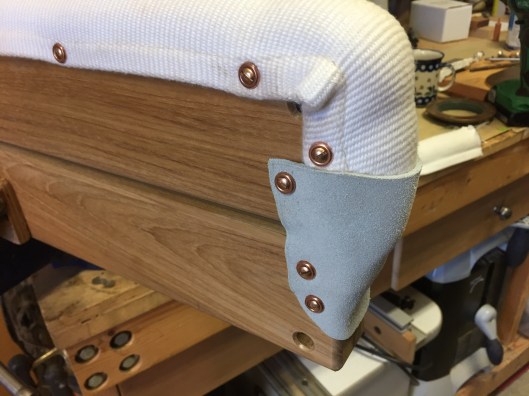
After thinking about it for nearly two years we developed a plan based on an idea from Lin and Larry Pardey. In their book, The Cost Concious Crusier, they wrote about how to make a removable dinghy boarding step. The one they describe however required fixed pad eyes added to the bulwark of the mothership. The step was attached to the padeyes. I did not want a permanent location or a requirement to bolt on hardware to our bulwarks. After more thinking and sketching we developed a design that incorporated removable bronze brackets, with welded eyes, padded with leather, that fit over the bulwark wherever we wanted.
I made a mock-up of the bulwarks from some scrap pine and gave it, along with a diagram of the brackets, to my best friend. I also included some scraps of silicon bronze I had left over from when we built the bulwarks brackets. He heated the bronze and bent the shape very accurately and then welded on the rings. He did a beautiful job. I polished them up and added the leather. That solved the problem for how to attach the step to th boat.

My friend Steve Chase heated and bent the silicon bronze brackets to fit a mock-up of the bulwarks. He he then heated, bent, and welded 5/16” silicon bronze rod for the pad eyes. He did a fantastic job. I glued the leather into the brackets to protect the bulwarks.
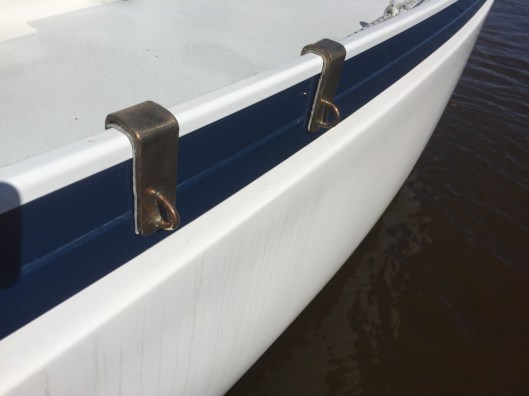
The brackets drop easily onto the bulwarks and can be quickly positioned along the length of the deck. Egads! Look at the grime on the top-sides. The picture was taken during the winter when 5e water was turned off to keep the pipes from feezing. The Far Reach needed a bath!
To make the step, I decided to build a mock up to help me determine how long and wide the step should be. While a wider step might seem better, I wanted a step that would be easy to store and employ. So, I cut a scrap plank of pine and tested out the design on the Far Reach. A step about 24” wide and about 8.5” wide seemed right.

I used a scrap piece of 5/4 home deck board as a mock-up to determine the demensions of the step. I taped some scrap indoor/outdoor carpet to the plank to serve as a cushion.
Then it was time to build the step itself. I incorporated some teak off-cuts left over from building the dorades along with the scrap (Iroko I think) from the old cockpit lockers I replaced during the rebuild. The only new purchases required were the 40 inches of “Gunwale-Guard” and some #6 bronze screws and finish washers I purchased from Jamestown Distributors.
The step is built in two parts: First, a frame, incorporating halflap joints from the old Iroko cockpit frame. The frame itself is made from is 3/4” thick x 1.5” iroko with the aforementioned half-laps. Second, the treads are 3/4“ thick x 4.5” wide Burmese teak with a 3/8” gap set between them. The final step is 24” wide and about 9” deep. It would have been possible to make the step from a single plank of wood about 3/4”-1” thick but the narrowest gunnel guard was for an edge about 1.5” thick. So the thicker double frame seemed the best way to make it fit properly with the Gunnel Guard

The half-laps were a good tight fit so I used resorcinol to glue the joints.

Once the glued half-laps were cured I glued and screwed the teak planks to the subframe. I staggered the holes to avoid splitting the wood. I installed wood plugs to cover the holes.
I glued and screwed the teak planks (left over from building the dorades) to the iroko subframe. I staggered the holes to avoid splitting the wood.
I used aerodux 185 resorcinol to glue up the subframe that used half-lap joints. Then, I used resorcinol and bronze screws to glue and screw the steps to the frame. Next, I drilled a hole in each corner of the step to accommodate the 3/8” Dacron three strand line that would serve as an adjustable bridal incorporating cow hitches for the brackets and figure eight knots to set the bridal length. I attached the padded “Gunnel Guard” with bronze screws and finish washers and finished it off with some leather end covers.

I purchased the Gunnel Guard and fasteners from Jamestown Distributors.
I cut the Gunnel Guard to fit the required length and Gayle sewed the edge back together. I covered the ends with chromed tanned leather to give it a clean finished look
We have not had a chance to try it out but I suspect we will have plenty of opportunity this summer. We don’t have a lifeline gate—so it’s up and over the life lines, under the lifelines, or release the life line when boarding.

The new step can be positioned where needed on either side of the boat. It’s large enough to be stable yet small enough to be stowed in the lazerette.
We can position it wherever we want but I think next to the boom gallows is probably the best place. The deck is wide there and the gallows frame is a great hand-hold. The step is big enough to provide a secure and stable step but small enough to be portable and easy to store.
