

Before: The primary winches were on a 2” riser pad and were, by design, very tall winches. They also suffered from aluminum/bronze corrosion—IMO a fundamentally bad design.
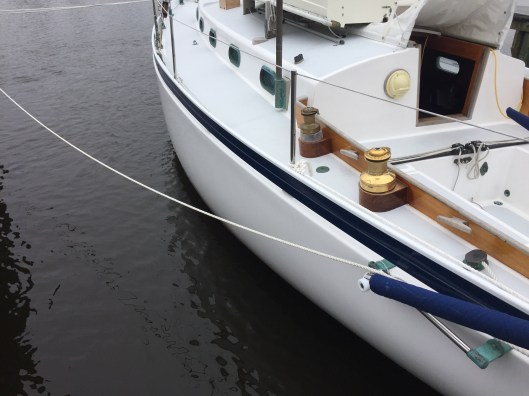
After: The new primaries are a little shorter in height plus I removed the riser pad. They are the same model as the smaller stays’l winches we installed last fall. Note the new winch base with bronze plate.
After completing a number of small projects this year, it was time to tackle the last big project for the foreseeable future—installing the new primary winches. The new winches are bronze Lewmar Ocean Series ST 46 two speed winches. The 46s replace the original 1982 era bronze two speed Lewmar 44s. Though they performed satisfactorily, the 44s were a flawed design from the beginning, mixing aluminum with bronze. The aluminum jaws were ate up with galvanic corrosion. For more information on the original installation click here.
We purchased the Lewmar 46s through Mauri Pro when they were on sale last summer. They arrived quickly and then sat for nearly nine months while we completed other projects. About the same time, we also also purchased new bronze Lewmar Ocean Series ST size 16 single speed winches for the stays’l. We bought those through Defender when they had a two for one sale last year. We installed those last October. That was an easy job as I kept the original bases and the hole pattern matched the old winches. For more info on that project click here.
I like the bronze open-style winch bases that some folks have on their boats. They look good and they don’t have to be varnished. But the 46 is a big winch. The largest bronze base made by Spartan Marine is not big enough to accommodate the base of the new winch. Custom designs such as sold by Port Townsend Foundry are very nice but over our budget. Even though I liked the bronze bases, there is no question the strongest most secure way to mount a winch, subject to tremendous loads, is to bolt it through the winch base and the deck. Open style bases can subject the deck and the coaming to significant loads if used improperly. And, bolting through the base and deck makes it harder for thieves to steal the winches. Interestingly, I met some sailors recently who had their Anderson ST winches stolen when their boat was on the hard in a boatyard. The winches were mounted on the open style bases that left the nuts accessible under the lip of the base. It probably took the the thieving bastards just a couple minutes to unbolt the winches…and that was that.
Because the hole pattern for the new winches is different than the old winches and because I had to significantly repair the old bases during the rebuilt of the Far Reach I decided to build new teak bases. Building bases is not a difficult project.
I purchased a short 8/4 plank of Burmese teak about 48” long x 9” wide from the hardwood section of Atlantic Veneer. The first thing I did was to run the plank though the planer to make sure it was dead flat. Then, I cut two pieces about 9” square and glued them together with Aerodux 185 Resorcinol glue. When it was cured, I traced the pattern for the new base and cut it out on a friend’s band saw. I sanded the new bases smooth with a bench-top sander and finished them off with a RO sander and 120 grit paper.

I glued up two planks of 8/4 teak with aerodux 185 resorcinol glue. This gave me a teak plank 4” thick and about 18” long. From this plank I was able to cut out the two bases with a band saw.

Aerodux 185 resorcinol glue. It’s mixed 5:1 by weight. It can be used down to 50°F and can be thickened with a filler

The new bases are about 7 3/4” x 7 3/4”.
I also wanted to eliminate the 2” teak riser pads that sat on top of the old bases. I had incorporated the risers during the 2009-2015 rebuild because I planned to run the jib sheet direct from the jib leads to the winches. (About 8” above deck due to the new raised bulwarks) The winches had to sit up pretty high to provide a proper lead. But the direct sheeting never worked out and I ended up routing the sheet to the winch in the traditional manner via a foot-block mounted aft on the fantail. So, I no longer needed to mount the primaries on the teak riser pads. Also, I never liked the high position of the winches as it looked ungainly.
I also came up with a new design for the winch bases. The origin of the new design was found in varnish. How’s that, you ask. Interestingly, the number one trouble area for varnish on the Far Reach turns out to be the top of the winch bases—the radius edge of the base itself. Because they are a horizontal surface, they get beat by the sun’s UV and despite an aggressive varnish schedule they were constantly getting compromised. The vertical side of the bases were fine as they don’t take the direct overhead rays of the sun. Additionally, the narrow gap between the coaming and the riser pad was hard to varnish. So, I decided to solve both challenges with a single solution. I purchased some 3/16” thick silicon bronze plate from Atlas Metals and fabricated it to sit on top of the new winch base. I planned to bolt the new winches through the bronze plate, the teak base, and the deck. With a bronze plate on top of the winch base there is no exposed horizontal teak to varnish. Also, the silicon bronze would acquire a green patina and be a nice contrast to the vertical sides of the varnished teak.
To get the shape of the bronze plate to match the shape of the top of the winch base I simply sat the bronze plate on the completed teak base, traced the base on the plate, and cut it out with my Bosch jig saw. I cut well outside the line I traced so it was a little too big. Then I placed the winch on the plate and marked where to drill the holes. I drilled the holes through the bronze plate on my bench top drill-press. I then positioned the plate on the base, clamped it in place and just barely drilled a tiny hole into the teak to mark the holes.

I cut the 3/16” bronze plates slightly oversized. Then I carefully marked the holes for the winches and drill the holes.
With the holes drilled in the plates, I positioned them carefully and drilled the holes. I dropped a short bolt into each hole as I went to ensure the plate could not move out of position and would be aligned with the base exactly where I wanted.
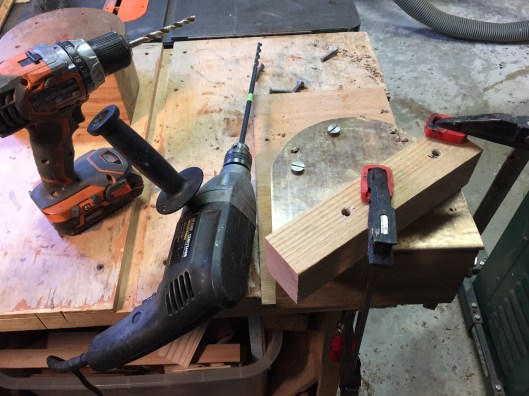
Because the drill depth of my small press is only two inches, I needed a way to drill all the way through the 4” thickness of the teak base. I used the drill press to drill a hole through a piece of 2” thick ash to create a jig. Then I positioned the ash “jig” over each hole. I clamped it in place and used it as a guide along with the 2” deep hole I previously drilled in the base. This gave me a guide about 4” long so I could drill a perfectly straight hole all the way through the base using a hand drill and a long 5/16” drill bit.
Then I moved the base and plate to the drill press and drilled the holes, dropping a short bolt through the hole in the plate and into the base keeping everything aligned as I went. Simple. With the plate positioned on the pad by the bolts I took the whole thing to the bench top sander and sanded the plates back towards the base sides using the base as a guide. I sanded till the bronze plate was about 1/16” proud of the base providing an easy reveal which guides the cutting-in when varnishing the sides of the base.
I radiused the edge of the plate with a file. At the square side of the base, where it butts up to the coaming I made the plate 1/16” shy of the edge to serve as a caulking groove. Often time, when bedding is required, if you don’t leave a little gap or space for the caulk to gather it will all get squeezed out when you tighten the bolts. But, if you leave a little gap for caulk it will remain in place so water can’t get in.
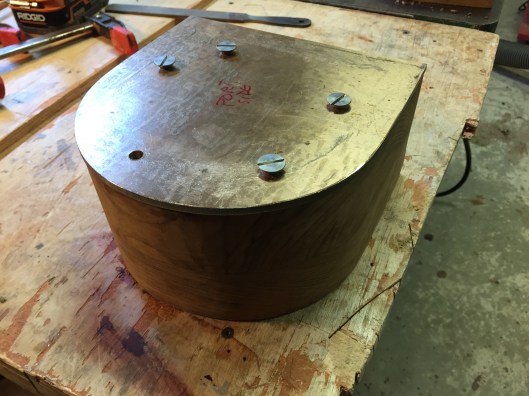
The completed bases drilled for the winches and bronze plates. I used a trim router with a cove bit to router a grove all the way around the base underneath and along the flat side of the base that fits against the coamings. That created a caulking groove so a bead of caulk would remain in place and could not be “squeezed out” when I tighten down on the bolts during installation. Next, I varnished the bases with eight coats of Epifanes high gloss varnish.
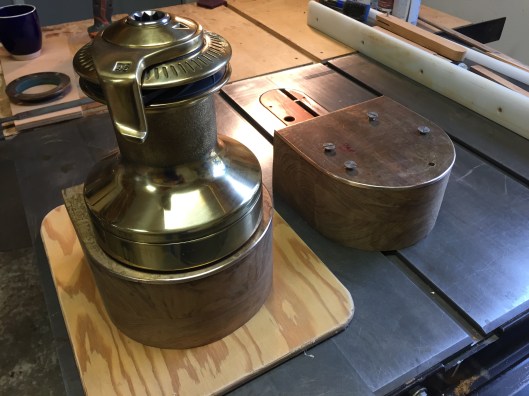
I took the bases, plates, and winches to the boat and checked the general fit. Looked good. I took the bases home and started varnishing. I applied eight coats over ten days.
While the varnishing was taking place I removed the old winches and bases from the Far Reach. I filled the original holes with epoxy. Then I took the new bases to the boat and positioned them and marked the deck. I drilled new holes through the upper skin of fiberglass and into the balsa core with a 7/8” fostner bit. I dug the core out of the deck and about a 1/4” under the lip of the hole I made with the fostner bit. I filled the holes with epoxy, essentially making epoxy plugs in the deck where the new bolts would pass through the deck. Once it was cured, I positioned the bases and drilled down through the plugs. I saved the 8” long bronze bolts I had used for the old Lewmars. But, to make them fit the new bases without the 2” tall riser pad, I had to shorten the bolts to about 6 inches long. I cut 2” off the boot with a hack saw and used a die to cut just over 2” of additional thread length on each of the ten bolts. Now it was time to mount the new winches.

The original winch bases with riser pads had to be removed.

I used Hyde multi 5 in 1 tool and putty knife along with some hardwood wedges. The Hyde tools are nice because the steel blade is full length to the end of the plastic handle and you won’t damage the handle when you hit it with a mallet.

After removing the old bases I positioned the new bases and drilled into the upper skin of the fiberglass deck. Then I used a 7/8” fostner bit to drill into the deck and dig out the balsacore. Next, I backfilled the holes with epoxy. After the epoxy cured I redrilled the holes with a 5/16” bit essentially creating epoxy plugs under the base and isolating the bolt holes from the balsa core. In this picture you can see the original hole pattern is different than the new pattern.
It took Gayle and me a couple hours to install the new bases and winches. We used brown polysulfide for the majority of the bedding compound with small amount of butyl rubber incorporated around the shafts of the bolts where they passed into the chamfered holes in the teak bases.
The new winches and bases look great. The winches sit much lower and since the stays’l winches are the same model as the primary winches, only smaller, they compliment each other.

After we installed the new winches and bases we touched up the deck with kiwigrip non skid paint and added two fresh coats of varnish to the coamings and winches bases.
The silicon bronze should turn green and make a nice contrast with the varnished bases and varnished coaming. It will be interesting to see how it works out and if it solves problems or creates them.
