
The Far Reach has a headstay and a forestay. Until recently, the forestay was dyneema with a spliced bronze eye connected to a bronze turnbuckle. It was difficult to disconnect the forestay and pull it back out of the way to make short tacking easier.
Cutter rigged boats like the Far Reach have a headstay and a forestay. The forestay is sometimes referred to as the inner-stay but it is correctly called the forestay as it supports the fore stays’l.
A challenge for cutter rigged boats is tacking with both stays rigged. If the slot between the two stays is narrow, and sometimes even if it is not particularly narrow, the jib can get “hung up” on the forestay as it passes through the slot from one tack to the other. When short-tacking (tacking a number of times in rapid succession) up a narrow channel you can get into trouble if your jib fails to pass through the slot between the stays. Occasional tacks should not be a concern and every sailor should be able to tack their cutter reliably with only the occasional hiccup.
There are several things a sailor can do to help the jib pass through the slot with minimal chance of a blown tack.
1. Ensure the lazy sheet has the slack pulled out of it before the tack is executed.
2. Ensure the lazy sheet won’t get hung up on any obstructions on the deck or forward face of the spar.
3. When you cast off the jib sheet make absolutely sure that it can run freely through the blocks. Otherwise even seemingly small resistance will make it impossible for the jib to pass through the slot.
4. The jib will have less difficulty passing through the slot if the stays’l is hoisted as the stays’l prevents the jib from getting doubled around the forestay.
5. If the wind is light it sometimes help to walk the jib through the slot–if you have crew.
But, the best way to make rapid tacking easier with a cutter is to turn it into a sloop. How’s that you say? By installing a forestay release device that allows you to quickly remove the forestay, and the stays’l in its bag, back to the base of the mast. With the forestay pulled back, the jib will have minimal obstruction as it crosses from one side of the boat to the other. The key to accomplishing the transformation is to make it quick and easy to remove the forestay.
The traditional way of disconnecting the forestay is with a purpose made release lever (often referred to as a high-field lever) such as the Schaefer Marine SRL 500, which lists for over $700. Although you can sometimes find it through a second party vendor for about $500, I think either price is ridiculous.
On the Far Reach I have a Colligo Marine, Dynex Dux (heat treated dyneema) forestay. I terminated the end with a traditional bronze eye and connected it to a bronze turnbuckle. To remove the forestay I had to untighten the turnbuckle, then pull a “fast-pin.” But, it was slow and inconvenient as I had to take a wrench and marlinspike to loosen the turnbuckle enough so I could turn it by hand and get enough slack to pull the fast pin.
I had been thinking about how to install a simple release system since long before I launched the Far Reach in the spring of 2015. I scoured the used marine hardware market looking for an old high-field lever such as the bronze ABI lever. No luck. I had too many other projects to deal with so it went to the back burner. I made do with what I had and kept my focus on sailing to the West Indies in December 2015.
When I returned from the Caribbean I began to think about how to make a release system using super strong but slippery dyneema and low friction rings. It seemed to me I could incorporate this modern technology in a traditional way that would fit with my desire the keep the Far Reach simple and elegant. I started to research solutions. I looked on-line. I drew sketches.
Finally, I ordered some 1/4″ dyneema, 3/8″ double braid dacron line, and a couple Antal Low Fiction Rings. The 1/4″ dyneema has a breaking strength of over 8000 lbs and a ridiculously low stretch–practically zero for such an application. And when the line is doubled the breaking strength doubles.
I sketched out a multi purchase system that I copied from a picture found on-line. I then spliced a couple short dyneema loops and cow hitched them around the Antal rings. Because I did not know how long the dyneema lanyard needed to be I simply tied the standing end to shackle. But the final ring used to turn the lanyard to the windlass, which I planned to use to tension the stay, caused too much deflection. I shared that concern with my friend Ben Zartman (click here for a link to his sailing blog or click here for a link to his rigging business Abednego Marine). Ben suggested a simpler approach using a single ring lashed closely to the tack fitting on the gammon iron.
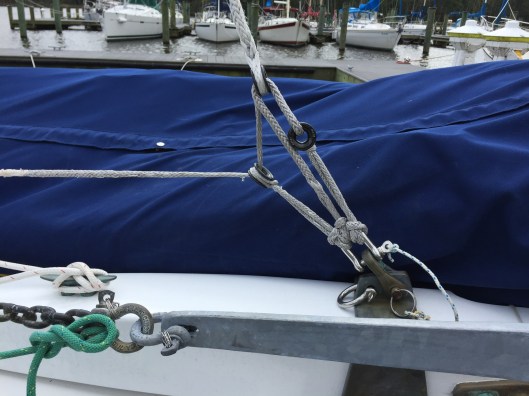
The first design was good. It was powerful with a 4:1 mechanical advantage. But, the deflection cased by the long loop for the final turning ring was excessive
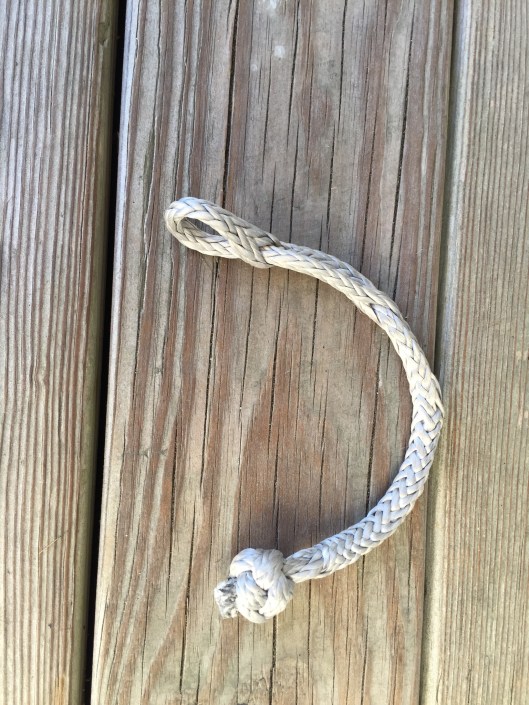
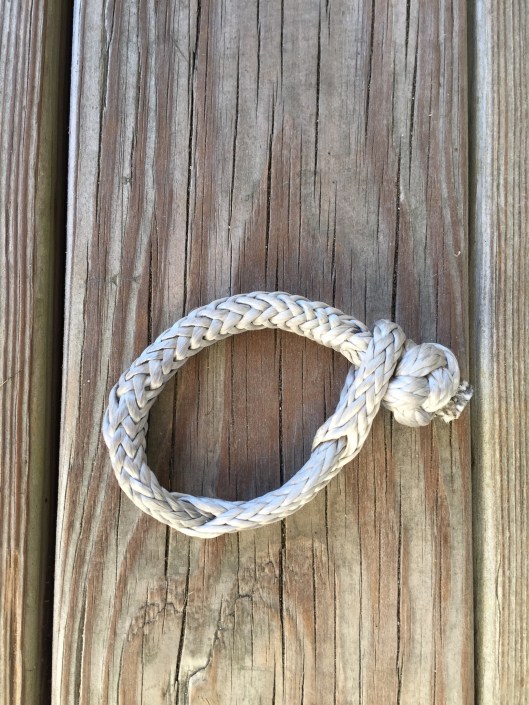
I made up a single 1/4″ dyneema soft shackle with a diamond knot. It was a surprisingly simple thing to tie. It took about 20 minutes. I learned it from Allen Edward’s helpful site at L-36. Click here for a link. It is easy to pass the diamond knot through the loop though it can’t be released under pressure. But, of course neither can a turnbuckle.
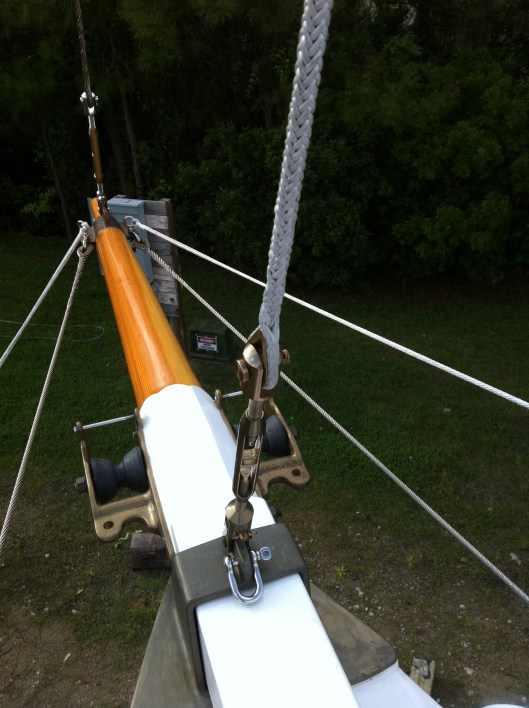
I used an oversized low friction ring I had on hand. I doubled the soft-shackle through the low friction ring keeping the ring close to the gammon iron. For the lanyard, I removed the core from the 3/8″ double-braid. Then I pulled the dyneema through the cover and spliced it in place leaving about four feet naked. The dyneema needs to be uncovered to work best in the rings and I also needed about 20″ to make the spliced eye. The braided cover improved the lanyard’s ability to grip the rope drum on the windlass and remain secured to a simple bronze cleat. I spliced a modified brummel eye in the naked end and cow hitched it around the oversized ring. I ran the line up to a low friction ring spliced into the lower end of the forestay (which replaced the bronze thimble I previously used), then back through the oversized ring secured to the gammon iron, and then directly to the windlass rope drum. I tried the system out and immediately recognized it as the solution I was looking for.
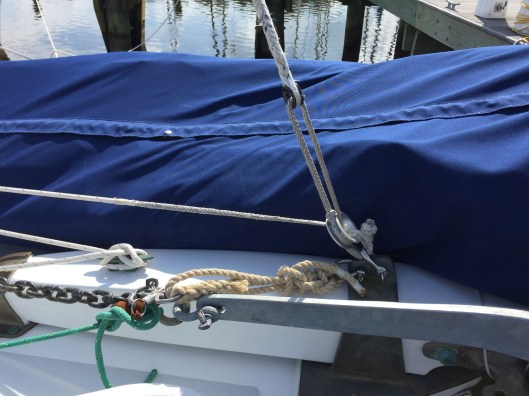
The final product. Very simple. Almost no deflection.

I tension the forestay with the windlass. The chain gypsy stop is engaged and the clutch is loosened so only the rope dum turns when the windlass is worked. If you follow the lanyard back from the low friction ring you can see a double braid cover I spliced over the dyneem. The Manila line is the pendant for the stays’l tack. The green line is a safety line for the anchor.
I tried it this past weekend during a two day sail. It worked perfectly. I could easily tension the stay with the windlass. In fact I have to be careful not to over tension the stay. It was easy to remove. Short tacking got a lot easier. Total cost–about $70.

Can I ask where you got your bowsprit anchor rollers? I looks like we made similar changes to our boats when rebuilding them. Very nice job you did.
LikeLike
Mike,
The bowsprit anchor rollers were cast from patterns made by Larry Pardey for Taleisin. The patterns are currently held in trust by Mystic River Foundry in CT. They can cast from any of the Pardey patterns on hand, plus many others they have in their own collection. Your POC is Sherry Hertzler. My rollers are very good but were cast by another foundry that had the patterns at that time. I think Sherry would have done a better job. She has cast a few other parts for me to include the hawes holes in the bullwarks, also from Pardey patterns. When I had my hardware cast she did not provide polishing them. I had to do that myslef. Not hard but you do need to purchase a few things to do it right. Probably about $100-$150 to get what you need but I assure you that you will use the equipment and supplies more than for just the rollers. I can provide you more info on what to do if you purchase the hardware. Here is a link to how I approached the installation of the rollers.
http://www.farreachvoyages.com/projects/bowspritmodification.html
I can’t hyperlink it so you will probably have to cut and paste it into your browser window. Once you go to the link scroll down about 3/4 of the way and you’ll see the documentation of the bow roller installation.
LikeLike
Do you have any issues with the hanks chafing the stay? How is stay attached onto the mast? Very interesting.
LikeLike
There is a tang on the mast. Don’t have a picture of it. I spliced the dyneema around a bronze themble but you can cow hitch it and it would work fine.
I used bronze hanks on the forestay for three years. I discussed that approach with John Franta at Colligo Marine. He said it would be no problem as long as the hanks were new. After three years of sailing, the only wear I could detect was some fuzz.
But I have eliminated the hanks and use luff rings now. I wrote a post on it. Look for it in the posts from Oct-Jan. If you can’t find it let me know. I think the luff rings are the way to go. Very simple. Super slick. No wear. Inexpensive. Less friction on the jib when tacking across the stays’l.
LikeLike
God blless
LikeLike