
The old vang/preventer required me to go forward to adjust or release it. And, I don’t like working on the leeward side deck if it’s not necessary
When sailing downwind, especially offshore, there are two specialized control lines you need to have on your boat. Both are associated with the mainsail. The first is a boom-vang and the second is a preventer.
The boom-vang, or vang for short, is attached to the underside of the boom usually a few feet aft of the goose-neck and the lower aft side of the mast just above the cabin top. The vang controls the mainsail leech tension. When close-hauled the vang is not critical as the mainsheet determines leech tension. But as soon as you start easing the mainsheet the end of the boom will begin to rise. A vang prevents that from happening. Without a vang, as you sail a deeper angle off the wind, especially in higher wind speeds, the boom can rise up significantly. This condition can induce oscillation and cause the boat to begin to roll more than it otherwise would. Also, as the boom goes up and down the sail will chafe on the standing rigging. So, a vang is essential to reduce oscillation and chafe and control leech tension.
A preventer is a line that runs from the boom, usually secured near the aft end of the boom, to a point well forward of amidships, usually near the gunwale. Often, the line goes through a block and back to the cockpit where it’s cleated. It is normally only required when sailing deep angles down wind. Its purpose is to reduce the likelihood of a gybe when sailing downwind by holding the boom out. But it also protects the crew and prevents damage to the rig should an unplanned gybe occur. It does that by preventing the boom from crossing the deck in a violent and uncontrolled manner. An uncontrolled gybe is one of the most dangerous things that can happen on a sailboat. An Uncontrolled gybe can break the boom, rip the traveler out of the deck, and can even lead to a dismasting. Uncontrolled gybes have killed people through head trauma and also knocked them off the boat leading to lost crew and drowning. The vang and the preventer have different jobs but are complimentary to one another. The vang holds the boom down and the preventer holds it forward. On most boats they are separate systems and when a modern style vang is fixed to the boom and mast they have to be separate.
Because we carry a hard dinghy inverted on the cabin top behind the mast we can’t use a standard vang on the Far Reach. The dinghy is in the way. So, I have always used a block and tackle that attaches to a heavily reinforced bail on the boom, about 8′ behind the gooseneck, to the bulwarks. I used a stout heavy-duty Schaefer Marine 4:1 block and tackle with integrated cam cleat and 1/2″ double braid line. It addressed both functions–vang and preventer–into one system. It worked as a vang to pull the boom down. And, when led forward also acted as a preventer. This approach has been around a long time. In fact, traditional gaffers and pilot cutter and such have used this type of vang/preventer for over a hundred years
Some argue against using the vang/preventer in such a manner as it can tear a poorly attached padeye out of the deck. But I use a strong nylon strop to secure the vang to our bulwarks next to the bronze bulwark brackets. The bulwarks are 7/8″ thick and 6″ tall. They are secured to the bronze brackets with four 1/4-20 bolts and the brackets are in turn bolted through the deck and G10 backing plates with four 5/16-18 bronze bolts and nuts. There are brackets supporting the bulwarks for its full length every three feet. It’s a very stout bulwark. If you do not have the luxury of bulwarks you can do as Hal Roth did and through bolt a heavy-duty pad-eye on each side deck forward of amidships with robust bolts and a stout backing plate. You can secure the lower end of the vang to the pad-eye.
The 5 3/4″ tall bulwarks on the Far Reach are stout. We made the bulwarks brackets by welding 1/4″ silicon bronze flat plate and incorporated 1″ ID silicon bronze tube for the stanchion bases. We alternated support brackets with stanchion bases for the length of the bulwarks. There is about 3.3′ between them.
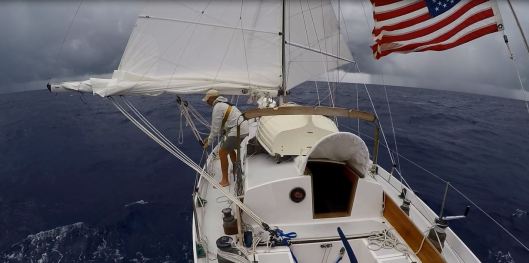
The block and tackle arrangement we used for the past two years served the purpose but was not ideal. The problem is I had to go forward and to the leeward side of the boat to adjust it. Offshore you want to avoid the lee side if possible. Also, you sure don’t want to lean out over the life lines to adjust the vang which is what I had to do. Take a look at the picture at the top of this post. It was taken about 600 miles ESE of the NC coast. Adjusting that block and tackle at night was the scariest thing I did on the offshore passage to and from the West Indies.
My nightmare scenario is sailing downwind and getting hit by an unexpected and sudden micro-burst that knocks the Far Reach over on her beam-ends. The boom and lee rail are in the water. To release the system I’d have to leave the cockpit, go forward on the side of the boat in the water, and literally wade or plunge down into the water to release the block and tackle to allow the mainsail to come out of the water all the while praying against down-flooding into the main companionway. Granted this is an extreme scenario but it was just such an event that sank the magnificent Baltimore Clipper, Pride of Baltimore in 1986.
For the past two years I made due with the block and tackle I had. However, I had been thinking for a long while how to make it a better safer system. Recently, I was going through some file pictures I have of Lin and Larry Pardey’s cutter Taleisin. I had seen those pictures a thousand times. But for the first time I noticed a pair of cam cleats on each side of the aft end of the cabin top. Then, I went through their books until I found a picture of what I was looking for–Taleisin sailing downwind with their vang preventer clearly visible. The running end of the vang ran back to the cam cleat on the cabin top. That’s what those cam cleats were for–and it looked like the solution I needed.
I have a whole series of blocks on hand so it only took a few minutes to come up with a 3:1 block and tackle using fiddle blocks without an integrated cam cleat. I purchased two additional Schaefer Marine anodized aluminum cam cleats. I cut some teak riser blocks. The cam cleats have a nylon bushing all the way through so I could use bronze fasteners instead of stainless steel.
I took the hardware to the boat and spent an afternoon mocking it all up. I spent another week drawing it out and thinking about it. I did not want to drill holes through the cabin top. Holes through the cabin top eventually end up leaking. So, I cut some 1/2″ thick G10 flat sheet with a 5/8″ hole saw without the center drill bit installed. I used a fostner bit to cut 3/4″ diameter holes in the top skin of the deck. I removed the balsa core, but did not cut into the inner fiberglass skin of the deck. Then I epoxied in the G10 plate and faired it smooth. When it was cured I placed the cam-cleats in place, marked the location for the fasteners. I drilled and tapped holes for the 1/4-20 bronze bolts. Next, I installed the cam cleats on their teak risers and bedded them with 3M 4000UV.

I drilled through the top skin and deck and cleaned out the balsa core. I filled the hole with epoxy, let it cure, and drilled back through the epoxy plug. Then I epoxied in 1/2″ thick G10 inserts and faired it smooth.

I drilled down into the G10 careful not to drill through the bottom skin. Then I tapped a hole with a blind tap for the 1/4-20 bolts.
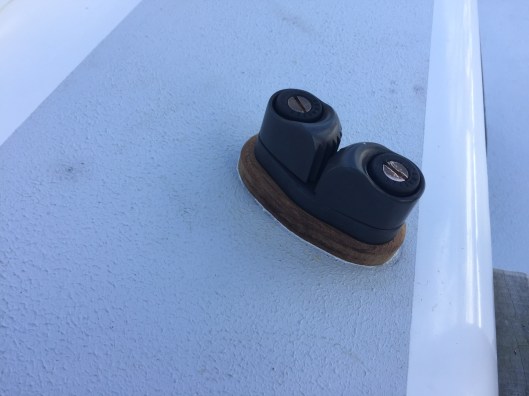
I installed the cam cleats with 1/4-20 bronze bolts and bedded them with 3M 4000UV. The tapped holes that don’t penetrate the inner skin means water can’t migrate into the balsa core deck.

The cam cleat is about 14″ forward of the aft end of the cabin top–one on each side. It’s a nice fair lead from the cam cleat to the lower fiddle block. I can adjust the line or cast it off from the cockpit.

It was a simple matter to cut and baseball stitch a leather chafing guard for the lower fiddle block.
The setup looks very good. The cleats are under the gallows footprint to they are out of the way. I can tighten or loosen the vang/preventer or cast it off immediately in an emergency from the cockpit without going to the low side of the boat. It’s a much safer set up than I had before. I’ll test it out next week but I fully expect it to work perfectly.
